How to Rip DVD on Mac
By ripping DVD to computer we can safely back up the purchased DVD movie, no need to worry about any damage on DVD disc.
Why should we rip DVD to computer
Although streaming video is becoming more and more main stream, purchasing DVD is still the major to watch a Movie. For those Holywood companies, they will release the DVD & Blu-Ray disc for their movies without any hesitation for the further revenue. And they always add some bonus into the DVD, which is not able to be seen in the cinema. That's why we buy a DVD movie.
 But the fragile material has always been the Achilles heel of DVD disc, your purchased DVD disc might be completely ruined by just a scratch. And the DVD disc is a sort of consumables, everytime you play it in your player device, the disc becomes weaker.
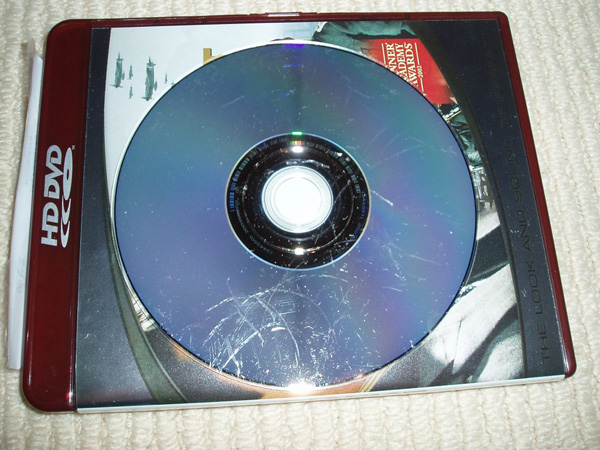
This is a typical scratched DVD, and it's difficult to be played anymore.
By ripping DVD movie to computer, we can back up the movie video safely, no need to worry about any damage happened on our important and precious DVD discs.
How to rip DVD on Mac
To burn videos to DVD, Mac provides the built-in "Disk Utility" to help us burn any .iso file to DVD disc, but Mac doesn't provide any feature to help us rip the video from DVD. So in this post, we are going to focus on how to rip DVD on Mac computer, of course the method stays valid on Windows computer.
Step 1, Download and Install DVD Ripper
ImElfin DVD Ripper is a top class software enables you to rip videos from DVD without any quality loss, it can handle any kind of protected or encrypted DVD disc and even convert the DVD movie to 158+ video format. Just a few clicks you can rip & convert your DVD to any video and back it up in your computer. Click the link to download the installation file.


Step 2, Insert DVD disc to computer then load the file into software
Open this software you can see the interface, in the left part you can see "Please drag-and-drop to input. Or add DVD files by clicking the button."
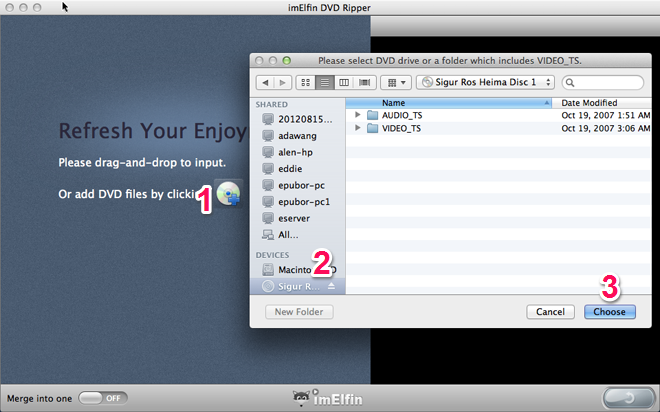
Click the disc button, then the Finder window will pop up, in the left column you can see your DVD disc name under "Devices", choose DVD disc name you will see the detailed files in the right window, then click "Choose" to confirm the file loading.
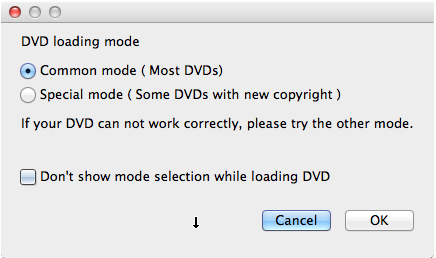
After clicking "Choose" the software will ask you to choose a loading mode, for most DVDs the "Common mode" will work, for some DVDs you need to choose "Special Mode". Do not know which one to choose? Nevermind, after you choose a mode, the software will scan your DVD files and load them in. If the loaded video's time length is incorrect, then you just need to click "Cancel" then repeat the previous operations and choose another loading mode.
You can preview the video length after choosing a loading mode, then judge if you were choosing the correct mode by the length. If everything is OK, click "OK" to add the video you want to rip into the software.
Step 3, Customize DVD ripping settings
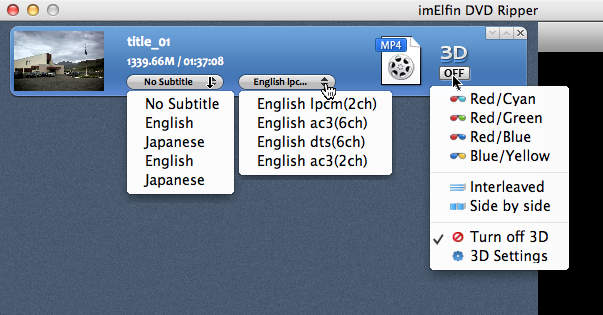
You can choose subtitle, stereo standard, active the 3D conversion feature or not. And the more important setting is the output format, by clicking the file icon you will be able to choose in which format you want to get the video.
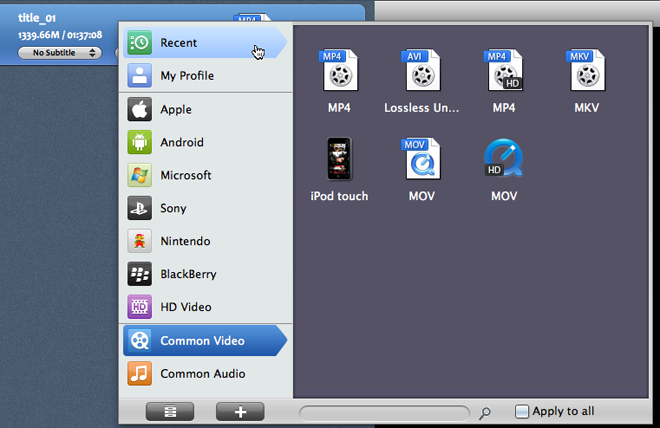
If you want to watch the movie on computer or TV, then choose common video format or HD Video. If want to watch the movie on your mobile device, the software has also collected almost all the popular device specs to make sure you will get the perfect suited video for your gadget. Suppose I need to watch the movie on my iPad, then I move the mouse to "Apple" then choose "iPad" in the right window.
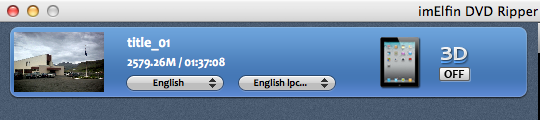
The output file size will changed with the output format you choose. For iPad 2, the video will be 2.6GB, which will be extremely amazing to watch on iPad.
Step 4. Rip the DVD to computer
Now all the setting are done, click the convert button in the bottom right corner to start the DVD ripping job.

You can see the exact process in the status bar, the the processing time depends on your computer's specs. The more powerful your computer is, the less time it will need.
Do not want to wait before computer? Okay, you can schedule a task after the conversion finishes. Look at the bottom left corner, you can make the program "Open Output Folder" or "Shutdown Computer".
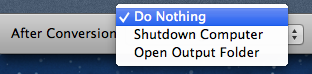
With this thoughtful feature, you can rip your DVD before you go to sleep, let the software do all the job for you then shut down when everything is finished. Save your time and money!