Convert DVD to Kindle Fire and play DVD videos on Kindle Fire
This guide shows how to convert DVD to Kindle Fire (HD) with a single tool, imElfin DVD Ripper, which enables people to play DVD on Kindle Fire easily.
In addition to eBook reading, many folks are fond of watching videos on the Kindle Fire. When we are on the go or on a trip and have no access to Wi-Fi, we may consider transferring DVD to Kindle Fire for later watching. As there is no built-in DVD player on the Kindle Fire, we can't directly put DVD on Kindle Fire and watch. This guide will tell you how to convert DVD to Kindle Fire (HD) and play DVD videos on it.
Typically, the process of converting DVD to Kindle Fire comprises of two parts with two single tools required. Part 1 is to rip DVD to Kindle Fire and Part 2 is to convert ripped files to Kindle Fire supported MP4 format. On the contrary, this guide will show you how to convert DVD to Kindle Fire (MP4) within one tool: imElfin DVD Ripper.
Convert DVD to Kindle Fire step-by-step
Step 1: Download and install imElfin DVD Ripper on your computer. Launch imElfin DVD Ripper.
Download imElfin DVD Ripper for Windows
Download imElfin DVD Ripper for Mac
Step 2: Load DVD. Insert your DVD to the DVD-ROM on your computer. Click the "Add" button, select the DVD drive and click "OK". No need to select specific files under "AUDIO _TS" or "VIDEO_TS" folder. The DVD files will be loaded immediately. ISO/IFO files and DVD folders are supported as well.

Note:
1. All DVD files will be selected by default. If you don't want to rip certain files, remember to uncheck them manually.
2. Check "Merge into one file" under the preview window on the right-hand side if you want to merge multi DVD files (under the same folder) into one. Files under different folders will not be merged into the same file.
Step 3: Set output subtitle language (if available), format, video/audio quality, and output folder.
Set the output subtitle language

Click "No Sbtitle" field to set the subtitle language for the ripped video. The available subtitle languages depend on the source DVD. If there are several DVD files selected, there may be repeated language options listed. Just set one subtitle language and make sure the "Apply to all" field on the right side is checked.
Set the output format
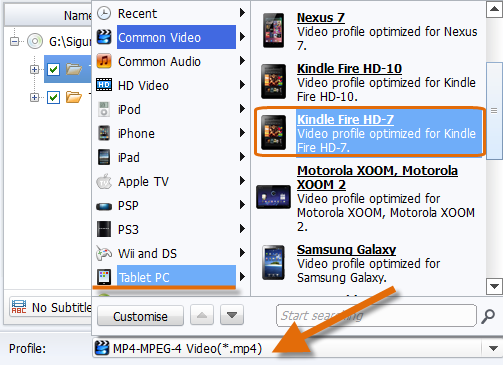
Click the profile field to select the output format for your Kindle Fire. Click "Tablet PC" and scroll down, you will find Kindle Fire HD-7, Kindle Fire HD-10 and Kindle Fire displayed. Set your Kindle Fire model as the output profile.
Set the output video/audio quality

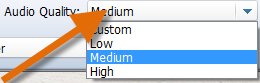
There are four levels for the output video and audio: Custom, Low, Medium and High. Since there is limited storage on Kindle Fire (HD), "Medium" level is recommended (default).
Set the output folder

Click the folder icon on the right-hand of "Output" label to customize the output folder. Never locate the output folder as your Kindle Fire drive (if you have plugged your Kindle Fire to the computer), or the program will occupy more resources and take longer time to write the output file to an external storage.
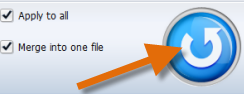
Step 4: Rip DVD. Click the round convert button in the lower right corner to start the ripping. The ripping process may take dozens of minutes or more than an hour, which completely depends on the original size and the output quality.
When the ripping is done, the progress bar will show "Finished" (100%). Click the play icon to view the output MP4 on the computer and click the folder icon to check the output folder.

Put DVD on Kindle Fire and play
Now it's time to load the converted DVD to Kindle Fire and watch.
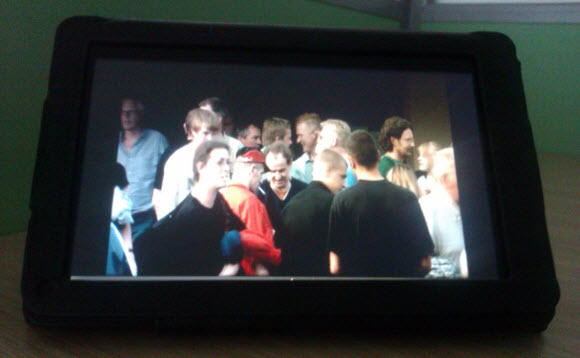
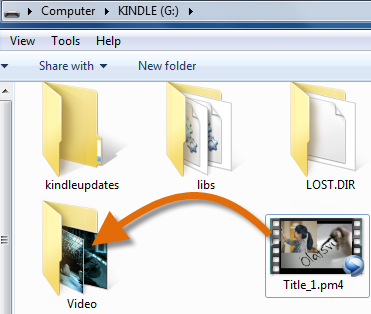
1. Connect the Kindle Fire to computer with the USB cable and it will be recognised as "Kindle" storage. Drag and drop the output MP4 file(s) to the "Video" folder under the "Kindle" storage.
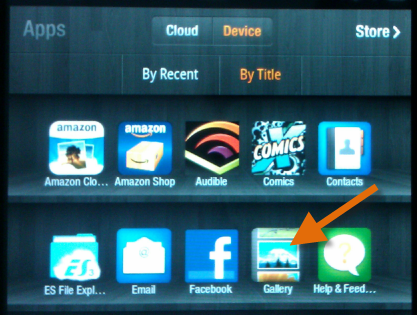
2. Navigate to "Apps" on the top bar of Kindle Fire, tap "Gallery" app then select "Video".
3. Tap the transferred DVD video, there will be a window "Complete action using" popping.
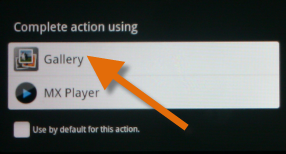
Select "Gallery" or another video player app to play DVD on Kindle Fire and Kindle Fire HD.